Guide Contents:
- Introduction
- How do I enter a Seek and Preserve Scenario
- Who can run Seek and Preserve Scenarios?
- Within Seek and Preserve Scenarios
- Seek and Preserve Locations
Introduction
Seek and Preserve scenarios can be run solo, or in a duo. You will need to seek out the survivors, who are not really that hard to find.. and then you will need to keep them alive for the time period.
Note: If you crash on your way into the scenario, and you are in there because you want a main mission completion, leave. You will not get the main mission completion in your challenge journal following a crash. You need to start again.
How do I enter a Seek and Preserve Scenario?
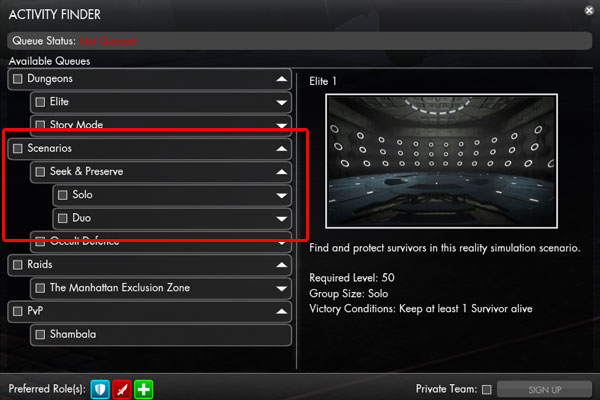
There is no physical entrance to the scenarios, you enter via the Activity Finder (Shift+V):
Alternatively, if you are feeling a bit reminiscent about TSW, you can head into The Sunken Library. In there right towards the back, you will find a console - using that with F also opens the Activity Finder window.
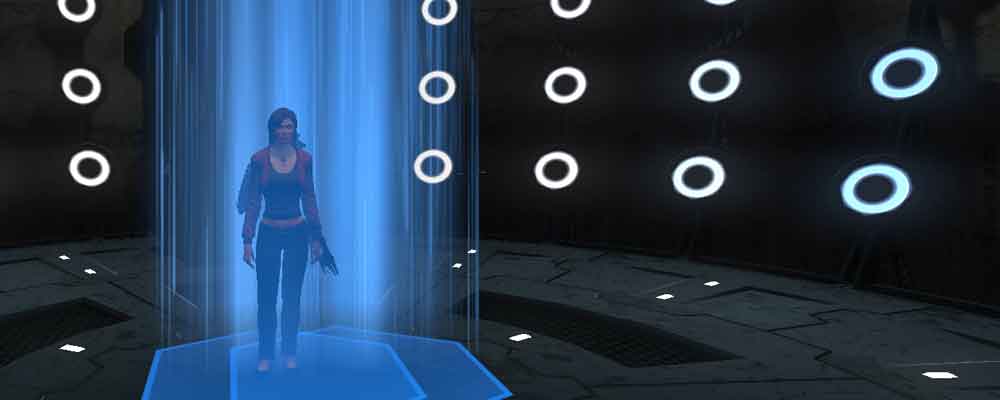
The scenario you go into is randomly chosen by the game from either The Mansion, The Hotel or The Castle. Once you get in there, you will find yourself on a platform like this:
The starting platform in the above image is from the Mansion, but you will find something similar in each Seek and Preserve Scenario. When you click the start button, the surrounding area will show itself to you. As you leave the starting platform, listening to the welcome text will help you - it is going to tell you how many survivors you need to keep alive to succeed and also what special feature awaits you from the scenario.
Who can run Seek and Preserve Scenarios?
Scenarios are intended for players at level 50. You can choose to run them on your own, or with a friend (Duo).
Requirements and Conditions:
Elite Level Entry Requirement Victory Conditions 1 Level 50 Keep at least 1 survivor alive 2 175 Item Power Keep at least 1 survivor alive 3 250 Item Power Keep at least 1 survivor alive 4 325 Item Power Keep at least 3 survivors alive 5 450 Item Power Keep at least 3 survivors alive 6 550 Item Power Keep at least 5 survivors alive 7 650 Item Power Keep at least 5 survivors alive 8 750 Item Power Keep at least 5 survivors alive 9 850 Item Power Keep at least 5 survivors alive 10 1000 Item Power Keep at least 5 survivors alive 11 1100 Item Power Keep at least 5 survivors alive 12 1200 Item Power Keep at least 5 survivors alive 13 1300 Item Power Keep at least 5 survivors alive 14 1400 Item Power Keep at least 5 survivors alive 15 1500 Item Power Keep at least 5 survivors alive 16 1600 Item Power Keep at least 5 survivors alive 17 1700 Item Power Keep at least 5 survivors alive Within Seek and Preserve Scenarios
As we mentioned, there are 3 types of Seek and Preserve Scenario - The Mansion, The Hotel and The Castle
Each Seek and Preserve Scenario has the same structure. You will be faced with Wave 1 (timer), a boss, Wave 2 (timer) and a final boss. The waves have a special feature that will be announced on entering:
Special Features
- Saboteur Subroutine
A NPC that looks fairly like the Survivors will run into the area where the Survivors are standing, and place a bomb near them. Make sure to listen out for the warning for the bomb so that you can pick it up (F) and move it somewhere else. It can be used to defeat the mobs that spawn in the scenario if you place it well. It can also be used against the boss if you are lucky enough to get one right at the end of a wave. Holding the bomb when its countdown timer expires, or standing in its AoE will harm you.
- Long Ranged Threat
This feature places snipers around the scenario that will periodcally target you. If you get a crosshair target over your head, you can dodge to remove it and the threat it causes you. Alternatively, you can move yourself out of the line of sight of the sniper. Not removing the target from over your head, will cause you to lose a signficant amount of HP when the sniper fires at you.
- Posession Protocol
If a survivor is being posessed, you will hear either "A survivor is being posessed. Intervene. ASAP.", "Survivor exhibits abnormal behaviour" or "Posession in progress, assist the survivor" from the Scenario. This means that the Bogieman has managed to cast something on the survivor and they have a purple marking above their head. Use F on the targetted survivor to remove the posession. Once you have completed the removal of the posession, a spectre will spawn. Kill it quickly before it harms the survivors with its cone attack.
- Spectral Disturbance. Piercing the Veil.
On the announcement of this feature, you will see a purple outlined circle making its way around the scenario. Allowing yourself to be within this area, will damage you. Periodically throughout the scenario, a very large AoE circle with a spectre in it will be created. Ensure to get out of this as it can cause instant death.
Stimulants
Stimulants can either spawn on the pads in the Seek and Preserve Scenarios, or randomly spawn when mobs are killed. If you are lucky enough to get the Aggression (red) Stimulants on the pads, keep those until your final boss fight. If you do not have the red stimulants when you are first go into the Scenario, use whatever is there and hope that when they re-spawn, that the red ones spawn instead!

Resilience Stimulant
Effect: Reduces Damage Taken by 75%
Celerity Stimulant
Effect: Increases movement speed by 45%
Aggression Stimulant
Effect: Increases damage done by 100%
Vitality Stimulant
Effect: Heals for 4% of Max. Health every second
After the first boss
When you have successfully defeated the first boss, you will get some help from the scenario via one of the following things:
- NPC If an NPC Spawns, they are going to help you kill the enemy mobs if they come within their aggro range. Do not worry about the NPC dying, it does not count towards your survivors.
- Turrets The turrets tend to spawn near your Survivors and will attack any enemy mobs that come close enough.
- Supply Chests If supply chests spawn, there will always be 3 of them. You have to attack them to open them, the contents are then available to loot. You can only hold 1 of each item type. The chests contain the following items:
Bear Arms: Arms 1 survivor in a 5m radius, enabling them to fight back.
First Aid Kit: Heals any injured survivors in the selected area.
Turret: Place a turret that fires at nearby hostiles for a short time.
- Healing Drone The game will tell you "Initiating support unit. Locate and activate the support drone." Once activated, the drone will heal you, or your partner if you are in a duo. It has a health bar, so be careful of it getting in the way during a fight.
- Friendly Snipers These snipers will target the enemy mobs, and hinder them.
- Militia Protocol - Arming 3 of the Survivors You will see additional survivors being equipped with weapons. They will attack enemy mobs that come close enough. Be careful if filth mobs get close - they may kill them, and then your survivors will have filth damaging them.
Seek and Preserve Locations
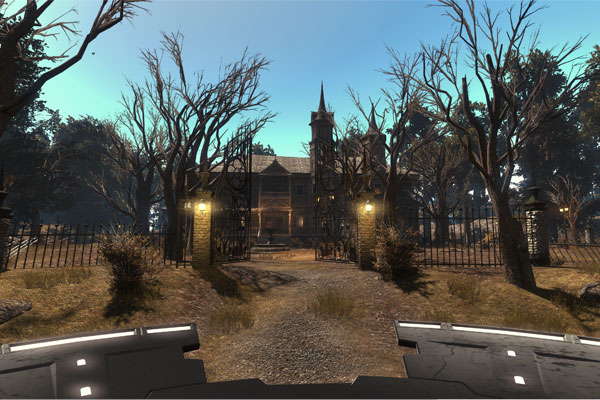
The Mansion
The Mansion is the same one as you will have found in Blue Mountain when you were missioning. In the seek and preserve scenario, you cannot however go inside the building.
At the start of the scenario, standing near the survivors at the back of the house is ideal. The waves spawn in each corner of the map, so make sure your mini map shows you the entire area, even if you have to zoom out a bit - then you can watching out for the orange spawn locations. In this scenario, the bosses usually spawn around the water. If you are doing the scenario in a duo, each standing on opposite sides of the length of the water will help you intercept the boss quickest.
The Hotel
The Hotel without Saïd doesn't have the same vibe, but at least you can get on with things without a long discussion. The survivors will all spawn inside the hotel in the main ground floor area. In a solo scenario, they are all grouped together. In a duo scenario they are split into two groups. The bosses in Hotel Scenarios can spawn either at the front or back of the hotel. If you are in a duo, ensure at the end of the waves to split up and cover both sides so that the boss does not trigger any attacks near the survivors.
The Castle
The Castle is perhaps the most tricky out of the three scenarios, though only because the paths the mobs can take starts adding extra factors in. If you are in a Duo, making sure each of you know who is standing where at the start of the 1st and 2nd wave can help lots. One of you can stand prepared in the room behind the survivors, and one up the stairs - this is going to help you get to the first spawn location quicker than the mobs can get to the survivors and subsequently increase your chances of keeping all the survivors alive!
The Loot
Once you have defeated the end boss, you can unlock the loot chest that spawns. Loot inside consists of distillates for Glyphs, Talismans and Weapons, sometimes there will be an Agent Dossier or signet bag in there too. Depending on the scenario you run, and whether you are lucky enough to get a blue chest, and also how many of your survivors are alive at the end - here are the maximim rewards (all survivors alive) you can expect to get your hands on for your completed Elite level Scenario:
Loot Table solo:
Elite Level Glyph Distillate** Talisman / Weapon Distillate* Anima Shards Glyph Bag E17 4x 7200-7300cc 2x 6900-7000cc 7200 Yes E16 4x 6800-7000cc 2x 6400-6600cc 6800 Yes E15 4x 6400-6600cc 2x 6100-6200cc 6400 Yes E14 4x 6100-6200cc 2x 5700cc 6000 Yes E13 4x 5700-5800cc 2x 5200cc 5600 Yes E12 4x 5200-5300cc 2x 4900cc 5200 Yes E11 4x 4800-4900cc 2x 4500cc 4800 Yes E10 4x 4500-4600cc 2x 4000-4100cc 4400 Yes E9 4x 4000-4200cc 2x 3800cc 4000 Yes E8 4x 3700-3800cc 2x 3300-3400cc 3600 Yes E7 4x 3200-3400cc 2x 2800-2900 3200 Yes E6 4x 2800-3000cc 2x 2500-2600cc 2800 Yes E5 4x 2400-2600cc 2x 2000-2100cc 2400 Yes E4 4x 2000-2100cc 2x 1500-1600cc 2000 Yes E3 4x 1600-1700cc 2x 1200-1400cc 1600 Yes E2 4x 1200-1400cc 2x 1000-1100cc 1200 Yes E1 4x 900-1100cc 2x 600-800cc 800 Yes * Distillate drop, may also be Energized.
** May also drop an Empowerment Catalyst
Loot Table duo:
Elite Level Glyph Distillate** Talisman / Weapon Distillate* Anima Shards Glyph Bag E17 4x 7200-7400cc 2x 6800-7000cc 7200 Yes E16 4x 6400-6600cc 2x 6100-6200cc 6800 Yes E15 4-6400-6600cc 2x 6000-6200cc 6400 Yes E14 E13 4x 5600-5800cc 2x 5300-5400cc 5600 Yes E12 4x 5200-5400cc 2x 7900cc 5200 Yes E11 E10 4x 4400-4600cc 2x 4000-4100cc 4400 Yes E9 4x 4000-4200cc 2x 3700cc 4000 Yes E8 4x 3600-3800cc 2x 3400cc 3600 Yes E7 4x 3200-3400cc 2x 2900-3000cc 3200 Yes E6 4x 2800-3000cc 2x 2500-2600cc 2800 Yes E5 4x 2500-2600cc 2x 2000cc 2400 Yes E4 4x 2000-2200cc 2x 1500-1700cc 2000 Yes E3 4x 1500-1700cc 2x 1300-1400cc 1600 Yes E2 4x 1300-1400cc 2x 900-1100cc 1200 Yes E1 4x 900-1100cc 2x 600-800cc 800 Yes * Distillate drop, may also be Energized.
** May also drop an Empowerment Catalyst
 Subscribe to RSS Feed